S3proxy簡介
1. 概述
Amazon S3 憑藉其可擴展性、耐用性和廣泛的功能集,鞏固了自己作為最廣泛使用的雲端儲存後端的地位。許多其他儲存後端都希望與 S3 API 相容,S3 API 是用於與 Amazon S3 互動的程式設計接口,這一點顯而易見。
然而,依賴 S3 API 的應用程式在遷移到不完全相容的替代儲存後端時可能會面臨挑戰。這可能會導致大量的開發工作和供應商鎖定。
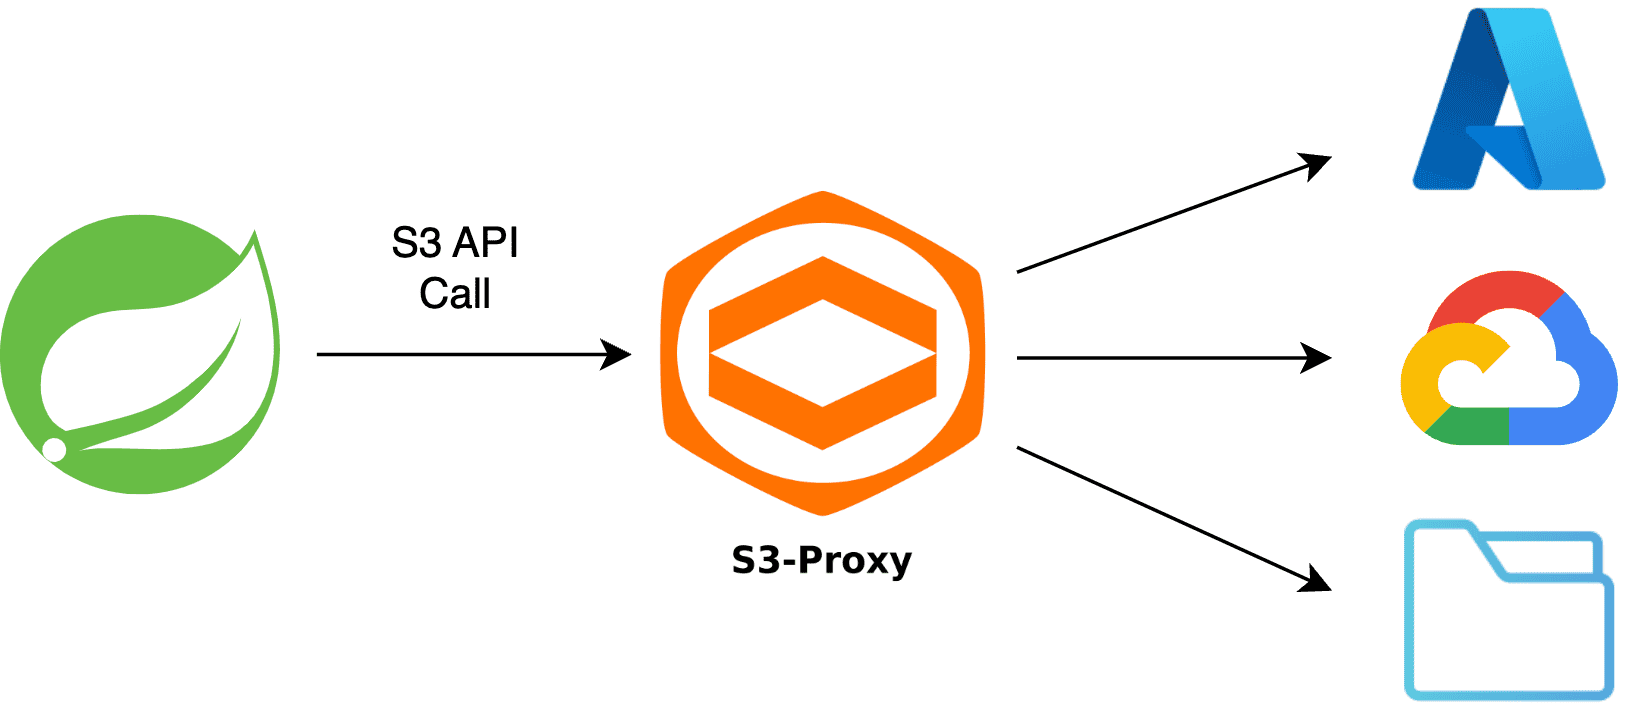
這就是S3Proxy發揮作用的地方。 S3Proxy 是一個開源函式庫,透過在 S3 API 和各種儲存後端之間提供相容層來解決上述挑戰。它允許我們使用已經熟悉的 S3 API 與不同的儲存後端無縫交互,而不需要進行大量修改。
在本教學中,我們將探討如何將 S3Proxy 整合到 Spring Boot 應用程式中,並將其配置為與 Azure Blob Storage 和 Google Cloud Storage 搭配使用。我們還將了解如何設定檔案系統作為本地開發和測試的儲存後端。
2.S3Proxy 的工作原理
在深入實作之前,讓我們仔細看看 S3Proxy 的工作原理。
S3Proxy 位於應用程式和儲存後端之間,可作為代理伺服器。當應用程式使用 S3 API 發送請求時,它會攔截該請求並將其轉換為配置的儲存後端的相應 API 呼叫。類似地,來自儲存後端的回應隨後被轉換回 S3 格式並返回給應用程式。

S3Proxy 使用嵌入式 Jetty 伺服器運行,並使用多雲工具包Apache jclouds處理轉換過程,以與各種儲存後端互動。
3. 設定項目
在使用 S3Proxy 存取各種儲存後端之前,我們需要包含必要的 SDK 依賴項並正確配置我們的應用程式。
3.1.依賴關係
讓我們先將必要的依賴項新增到專案的pom.xml檔案中:
<dependency>

 <groupId>org.gaul</groupId>

 <artifactId>s3proxy</artifactId>

 <version>2.3.0</version>

 </dependency>

 <dependency>

 <groupId>software.amazon.awssdk</groupId>

 <artifactId>s3</artifactId>

 <version>2.28.23</version>

 </dependency>
S3Proxy 依賴項為我們提供了代理伺服器和必要的 Apache jclouds 元件,我們將在本教程後面配置這些元件。
同時, Amazon S3 相依性為我們提供了S3Client類,它是 S3 API 的 java 包裝器。
3.2.定義與雲端無關的儲存屬性
現在,我們將定義一組與雲端無關的儲存屬性,可以在不同的儲存後端使用。
我們將這些屬性儲存在專案的application.yaml檔案中,並使用@ConfigurationProperties將值對應到 POJO,我們將在定義 jclouds 元件和S3Client bean 時引用該 POJO:
@ConfigurationProperties(prefix = "com.baeldung.storage")

 class StorageProperties {


 private String identity;


 private String credential;


 private String region;


 private String bucketName;


 private String proxyEndpoint;


 // standard setters and getters


}上述屬性代表大多數儲存後端所需的常見設定參數,例如安全憑證、區域和儲存桶名稱。此外,我們也聲明proxyEndpoint屬性,它指定嵌入式 S3Proxy 伺服器將執行的 URL。
讓我們來看看application.yaml檔案的一個片段,它定義了將自動映射到StorageProperties類別的所需屬性:
com:

 baeldung:

 storage:

 identity: ${STORAGE_BACKEND_IDENTITY}

 credential: ${STORAGE_BACKEND_CREDENTIAL}

 region: ${STORAGE_BACKEND_REGION}

 bucket-name: ${STORAGE_BACKEND_BUCKET_NAME}

proxy-endpoint: ${S3PROXY_ENDPOINT}我們使用${}屬性佔位符從環境變數載入屬性值。
因此,此設定允許我們外部化後端儲存屬性並在我們的應用程式中輕鬆存取它們。
3.3.在應用程式啟動時初始化 S3Proxy
為了確保嵌入式 S3Proxy 伺服器在我們的應用程式啟動時啟動並運行,我們將建立一個實作ApplicationRunner介面的S3ProxyInitializer類別:
@Component

 class S3ProxyInitializer implements ApplicationRunner {


 private final S3Proxy s3Proxy;


 // standard constructor


 @Override

 public void run(ApplicationArguments args) {

 s3Proxy.start();

 }


}使用建構函式註入,我們注入S3Proxy的實例,並使用它在run()方法內啟動嵌入式代理伺服器。
值得注意的是,我們還沒有建立S3Proxy類別的 bean,我們將在下一節中建立它。
4. 存取 Azure Blob 儲存
現在,要使用 S3Proxy 存取 Azure Blob 存儲,我們將建立一個StorageConfiguration類別並註入我們之前建立的與雲端無關的StorageProperties 。我們將在這個新類別中定義所有必需的 bean。
首先,我們先建立一個BlobStore bean。這個 bean 代表我們將與之互動的底層儲存後端:
@Bean

 public BlobStore azureBlobStore() {

 return ContextBuilder

 .newBuilder("azureblob")

 .credentials(storageProperties.getIdentity(), storageProperties.getCredential())

 .build(BlobStoreContext.class)

 .getBlobStore();

 }
我們使用 Apache jclouds 的ContextBuilder來建立一個使用azureblob提供者配置的BlobStoreContext實例。然後,我們從此上下文中取得BlobStore實例。
我們也傳遞來自註入的StorageProperties實例的安全憑證。對於Azure Blob存儲,儲存帳戶的名稱將是我們的identity ,其對應的存取金鑰將是我們的credential 。
配置BlobStore後,讓我們定義S3Proxy bean:
@Bean

 public S3Proxy s3Proxy(BlobStore blobStore) {

 return S3Proxy

 .builder()

 .blobStore(blobStore)

 .endpoint(URI.create(storageProperties.getProxyEndpoint()))

 .build();

}我們使用Blobstore實例和application.yaml檔案中配置的proxyEndpoint來建立S3Proxy bean。該 bean 負責將 S3 API 呼叫轉換為底層儲存後端。
最後,讓我們建立S3Client bean:
@Bean

 public S3Client s3Client() {

 S3Configuration s3Configuration = S3Configuration

 .builder()

 .checksumValidationEnabled(false)

 .build();

 AwsCredentials credentials = AwsBasicCredentials.create(

 storageProperties.getIdentity(),

 storageProperties.getCredential()

 );

 return S3Client

 .builder()

 .region(Region.of(storageProperties.getRegion()))

 .endpointOverride(URI.create(storageProperties.getProxyEndpoint()))

 .credentialsProvider(StaticCredentialsProvider.create(credentials))

 .serviceConfiguration(s3Configuration)

 .build();

}我們應該注意,我們在S3Configuration中禁用了校驗和驗證。這是必要的,因為 Azure 傳回非 MD5 ETag,這在使用預設配置時會導致錯誤。
在本教程中,為簡單起見,我們也將對其他後端儲存使用相同的S3Client bean。但是,如果我們不使用 Azure Blob 存儲,則可以刪除此配置。
有了這些 Bean,我們的應用程式現在可以使用熟悉的 S3 API 與 Azure Blob 儲存體進行互動。
5. 存取GCP雲端存儲
現在,要存取 Google Cloud Storage,我們只需要對BlobStore bean 進行更改。
首先,讓我們為 Google Cloud Storage 建立一個新的BlobStore bean。我們將使用 Spring 設定檔根據活動設定檔有條件地建立 Azure 或 GCP BlobStore bean:
@Bean

 @Profile("azure")

 public BlobStore azureBlobStore() {

 // ... same as above

 }


 @Bean

 @Profile("gcp")

 public BlobStore gcpBlobStore() {

 return ContextBuilder

 .newBuilder("google-cloud-storage")

 .credentials(storageProperties.getIdentity(), storageProperties.getCredential())

 .build(BlobStoreContext.class)

 .getBlobStore();

}在這裡,當gcp設定檔處於活動狀態時,我們使用google-cloud-storage提供者建立一個BlobStore實例。
對於 Google Cloud Storage, identity將是我們服務帳戶的電子郵件 ID, credential將是對應的 RSA 私密金鑰。
透過此配置更改,我們的應用程式現在可以使用 S3 API 與 Google Cloud Storage 進行互動。
6. 使用檔案系統進行本地開發和測試
對於本機開發和測試,使用本機檔案系統作為儲存後端通常很方便。讓我們看看如何設定 S3Proxy 來使用它。
6.1.設定我們的本地配置
首先,讓我們在StorageProperties類別中新增一個屬性,以指定本機檔案系統儲存的基底目錄:
private String localFileBaseDirectory;


// standard setters and getters接下來,我們將建立一個新的LocalStorageConfiguration類別。我們將使用@Profile為本local和test設定檔啟動此類。在本課程中,我們將根據需要更新 bean 以使用本機檔案系統:
@Configuration

 @Profile("local | test")

 @EnableConfigurationProperties(StorageProperties.class)

 public class LocalStorageConfiguration {


 private final StorageProperties storageProperties;


 // standard constructor


 @Bean

 public BlobStore blobStore() {

 Properties properties = new Properties();

 String fileSystemDir = storageProperties.getLocalFileBaseDirectory();

 properties.setProperty("jclouds.filesystem.basedir", fileSystemDir);

 return ContextBuilder

 .newBuilder("filesystem")

 .overrides(properties)

 .build(BlobStoreContext.class)

 .getBlobStore();

 }


 @Bean

 public S3Proxy s3Proxy(BlobStore blobStore) {

 return S3Proxy

 .builder()

 .awsAuthentication(AuthenticationType.NONE, null, null)

 .blobStore(blobStore)

 .endpoint(URI.create(storageProperties.getProxyEndpoint()))

 .build();

 }


}在這裡,我們使用filesystem提供者建立一個BlobStore bean 並配置我們的基底目錄。
然後,我們為檔案系統BlobStore建立一個S3Proxy bean。請注意,我們將身份驗證類型設定為NONE因為我們不需要對本機檔案系統儲存進行任何身份驗證。
最後,讓我們建立一個不需要任何憑證的簡化S3Client bean:
@Bean

 public S3Client s3Client() {

 return S3Client

 .builder()

 .region(Region.US_EAST_1)

 .endpointOverride(URI.create(storageProperties.getProxyEndpoint()))

 .build();

}在上面,我們對US_EAST_1區域進行了硬編碼,但是,區域選擇對於此配置並不重要。
透過此設置,我們的應用程式現在配置為使用本機檔案系統作為其儲存後端。這消除了連接到真正的雲端儲存服務的需要,從而降低了成本並加快了我們的開發和測試週期。
6.2.測試與S3Client的交互
現在,讓我們編寫一個測試來驗證我們實際上是否可以使用S3Client與本機檔案系統儲存進行互動。
我們首先在application-local.yaml檔案中定義必要的屬性:
com:

 baeldung:

 storage:

 proxy-endpoint: http://127.0.0.1:8080

 bucket-name: baeldungbucket

 local-file-base-directory: tmp-store
接下來,讓我們設定我們的測試類別:
@SpringBootTest

 @TestInstance(Lifecycle.PER_CLASS)

 @ActiveProfiles({ "local", "test" })

 @EnableConfigurationProperties(StorageProperties.class)

 class LocalFileSystemStorageIntegrationTest {


 @Autowired

 private S3Client s3Client;


 @Autowired

 private StorageProperties storageProperties;


 @BeforeAll

 void setup() {

 File directory = new File(storageProperties.getLocalFileBaseDirectory());

 directory.mkdir();


 String bucketName = storageProperties.getBucketName();

 try {

 s3Client.createBucket(request -> request.bucket(bucketName));

 } catch (BucketAlreadyOwnedByYouException exception) {

 // do nothing

 }

 }


 @AfterAll

 void teardown() {

 File directory = new File(storageProperties.getLocalFileBaseDirectory());

 FileUtils.forceDelete(directory);

 }


}在用@BeforeAll註解的setup()方法中,我們建立基本目錄和儲存桶(如果它們不存在)。並且,在我們的teardown()方法中,我們刪除基底目錄以在測試後進行清理。
最後,讓我們寫一個測試來驗證我們是否可以使用S3Client類別上傳檔案:
@Test

 void whenFileUploaded_thenFileSavedInFileSystem() {

 // Prepare test file to upload

 String key = RandomString.make(10) + ".txt";

 String fileContent = RandomString.make(50);

 MultipartFile fileToUpload = createTextFile(key, fileContent);


 // Save file to file system

 s3Client.putObject(request ->

 request

 .bucket(storageProperties.getBucketName())

 .key(key)

 .contentType(fileToUpload.getContentType()),

 RequestBody.fromBytes(fileToUpload.getBytes()));


 // Verify that the file is saved successfully by checking if it exists in the file system

 List<S3Object> savedObjects = s3Client.listObjects(request ->

 request.bucket(storageProperties.getBucketName())

 ).contents();

 assertThat(savedObjects)

 .anyMatch(savedObject -> savedObject.key().equals(key));

 }


 private MultipartFile createTextFile(String fileName, String content) {

 byte[] fileContentBytes = content.getBytes();

 InputStream inputStream = new ByteArrayInputStream(fileContentBytes);

 return new MockMultipartFile(fileName, fileName, "text/plain", inputStream);

}在我們的測試方法中,我們首先準備一個具有隨機名稱和內容的MultipartFile 。然後,我們使用S3Client將此檔案上傳到我們的測試儲存桶。
最後,我們透過列出儲存桶中的所有物件並斷言具有隨機金鑰的檔案存在來驗證檔案是否已成功保存。
七、結論
在本文中,我們探索了在 Spring Boot 應用程式中整合 S3Proxy。
我們完成了必要的配置並設定了與雲端無關的儲存屬性以在不同的儲存後端使用。
然後,我們研究如何使用 Amazon S3 API 存取 Azure Blob 儲存體和 GCP 雲端儲存。
最後,我們建立了一個使用檔案系統的環境,用於本地開發和測試。
與往常一樣,本文中使用的所有程式碼範例都可以在 GitHub 上找到。