使用 Postman 進行負載測試
一、概述
負載測試是現代企業應用程序軟件開發生命週期 (SDLC) 的關鍵部分。在本教程中,我們將使用Postman 集合來執行簡單的負載測試活動。
2. 設置
我們可以下載並安裝與我們系統操作系統兼容的桌面客戶端。或者,我們可以創建一個免費的 Postman 帳戶並訪問Web 客戶端。
現在,讓我們通過導入 Postman's Collection Format v2.1 中可用的一些示例 HTTP 請求來創建一個名為“Google Apps - 負載測試”的新集合:
{
 "info": {
 "_postman_id": "ddbb5536-b6ad-4247-a715-52a5d518b648",
 "name": "Google Apps - Load Testing",
 "schema": "https://schema.getpostman.com/json/collection/v2.1.0/collection.json"
 },
 "item": [
 {
 "name": "Get Google",
 "event": [
 {
 "listen": "test",
 "script": {
 "exec": [
 ""
 ],
 "type": "text/javascript"
 }
 }
 ],
 "request": {
 "method": "GET",
 "header": [],
 "url": {
 "raw": "https://www.google.com",
 "protocol": "https",
 "host": [
 "www",
 "google",
 "com"
 ]
 }
 },
 "response": []
 },
 {
 "name": "Get Youtube",
 "event": [
 {
 "listen": "test",
 "script": {
 "exec": [
 ""
 ],
 "type": "text/javascript"
 }
 }
 ],
 "request": {
 "method": "GET",
 "header": [],
 "url": {
 "raw": "https://www.youtube.com/",
 "protocol": "https",
 "host": [
 "www",
 "youtube",
 "com"
 ],
 "path": [
 ""
 ]
 }
 },
 "response": []
 },
 {
 "name": "Get Google Translate",
 "event": [
 {
 "listen": "test",
 "script": {
 "exec": [
 ""
 ],
 "type": "text/javascript"
 }
 }
 ],
 "request": {
 "method": "GET",
 "header": [],
 "url": {
 "raw": "https://translate.google.com/",
 "protocol": "https",
 "host": [
 "translate",
 "google",
 "com"
 ],
 "path": [
 ""
 ]
 }
 },
 "response": []
 }
 ]
}我們應該在導入數據時使用“原始文本”選項:
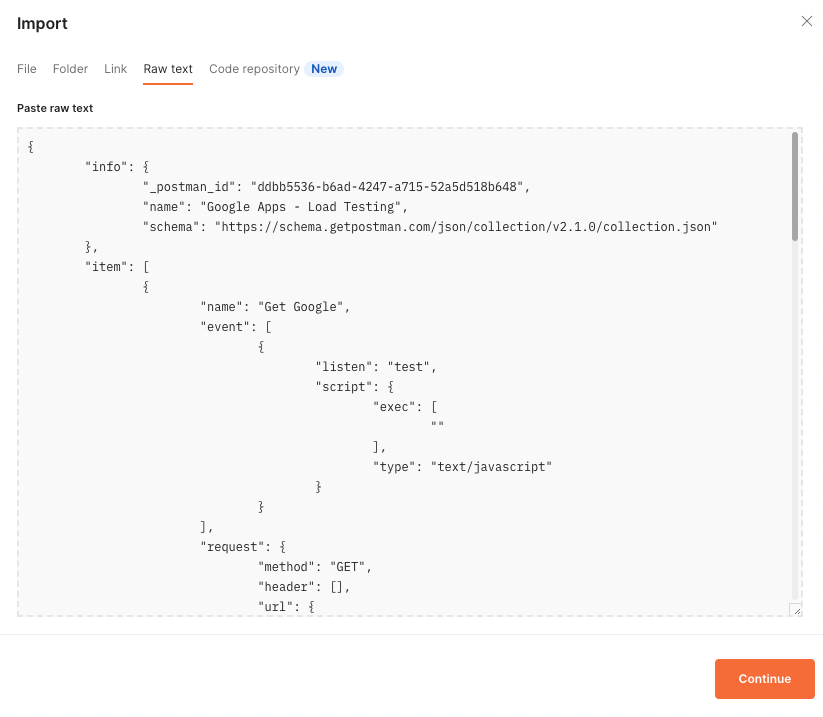
而已!我們只需要通過單擊 Continue 操作來完成導入任務,我們將在 Postman 中準備好我們的測試集合。
3. 使用 Postman Collection Runner
在本節中,我們將探討如何使用 Postman 的 Collection Runner 來執行“Google Apps - 負載測試”集合中的 API 請求並執行基本的負載測試。
3.1。基本配置
我們可以通過右鍵單擊集合來啟動 Collection Runner:
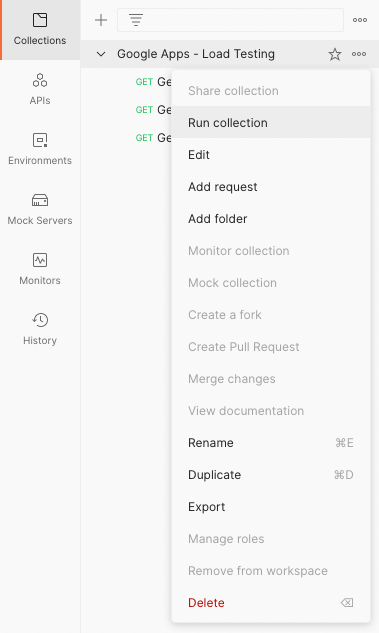
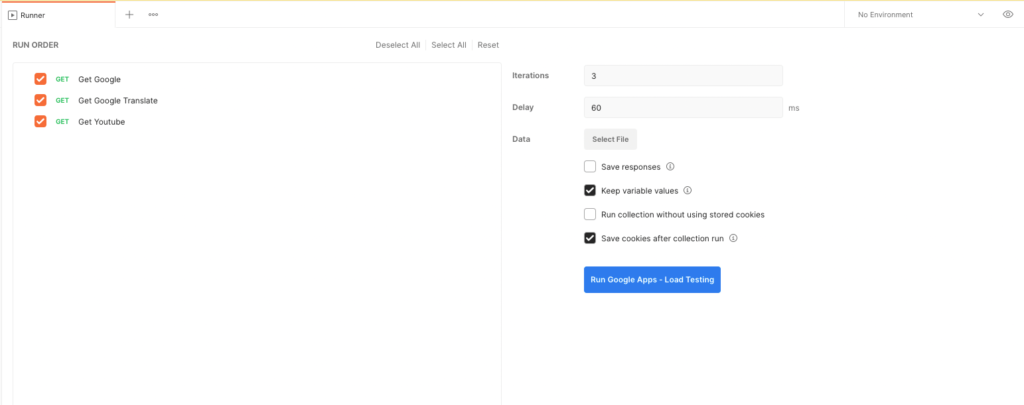
在 Runner 模式下,讓我們通過指定執行順序、迭代次數和連續 API 命中之間的延遲來配置運行:
接下來,讓我們點擊“Run Google Apps – Load Testing”,開始對集合內的 API 請求進行基本的負載測試:
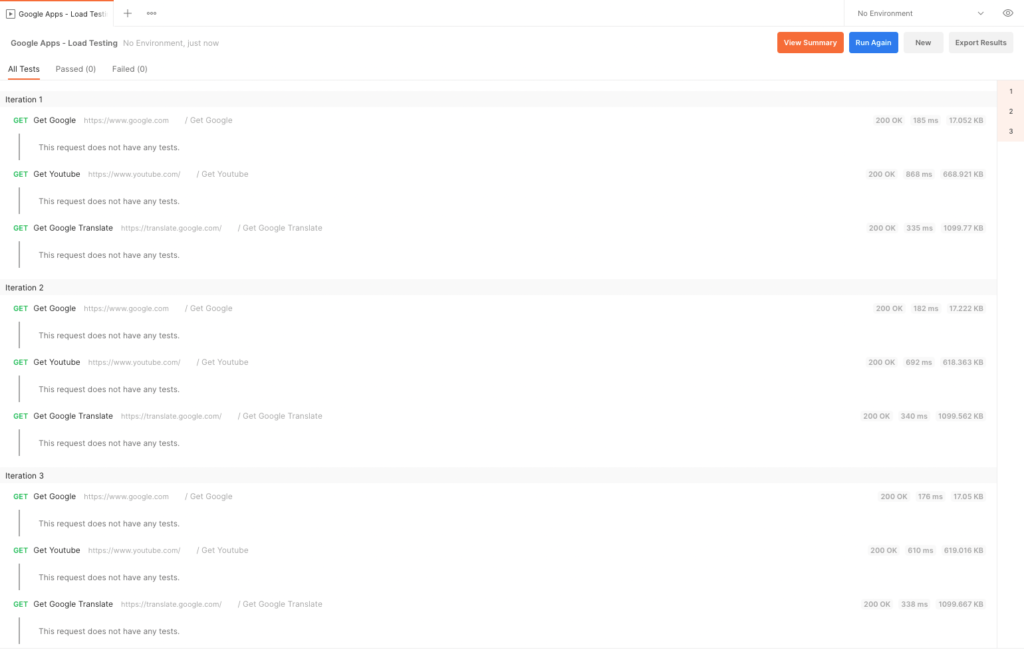
當運行器執行 API 請求時,我們可以看到跨越多次迭代的每個 API 命中的實時結果。
3.2.使用測試腳本的高級配置
使用 Postman GUI,我們能夠控制 API 的執行順序。但是,我們可以通過使用 Postman 的測試腳本功能來更好地控制執行流程。
假設只有在“Google API”的點擊返回 HTTP 200狀態代碼時,我們才希望在工作流中包含“Google Translate”API。否則,我們想直接點擊“Youtube API”:
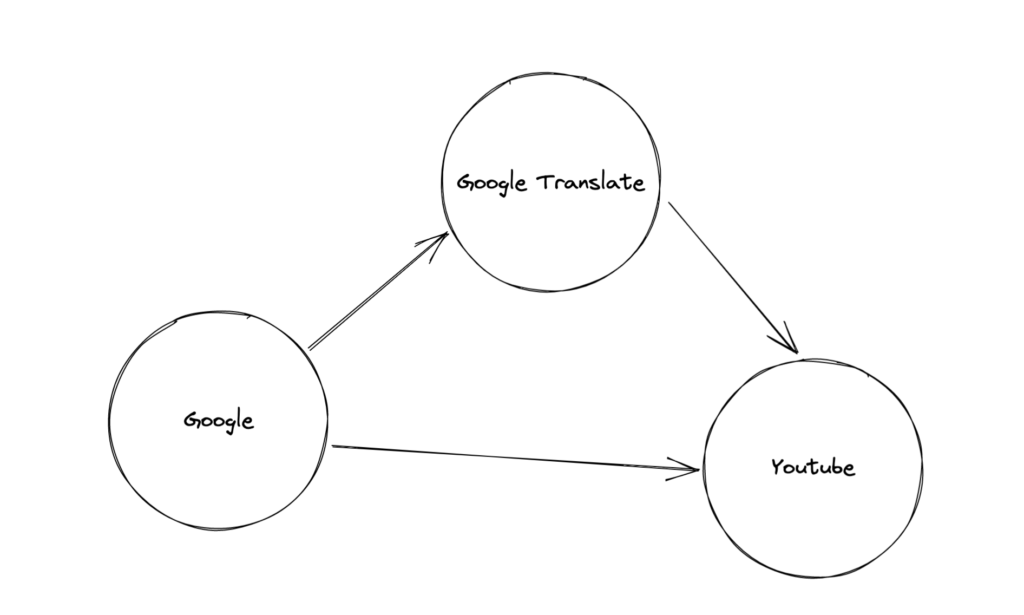
我們將首先在“Get Google”請求的測試部分添加一個簡單的條件語句:
if (pm.response.code == 200) {
 postman.setNextRequest("Get Google Translate");
 }
 else {
 postman.setNextRequest("Get Youtube");
 }
接下來,我們將“Get Youtube”設置為“Get Google Translate”之後要執行的後續請求:
postman.setNextRequest("Get Youtube");此外,我們知道“Get Youtube”是流程中的最後一個請求,因此我們將其後的下一個請求設置為null :
postman.setNextRequest(null);最後,讓我們看看帶有測試腳本的完整集合:
{
 "info": {
 "_postman_id": "ddbb5536-b6ad-4247-a715-52a5d518b648",
 "name": "Google Apps - Load Testing",
 "schema": "https://schema.getpostman.com/json/collection/v2.1.0/collection.json"
 },
 "item": [
 {
 "name": "Get Google",
 "event": [
 {
 "listen": "test",
 "script": {
 "exec": [
 "if (pm.response.code == 200) {",
 " postman.setNextRequest(\"Get Google Translate\");",
 "}",
 "else {",
 " postman.setNextRequest(\"Get Youtube\");",
 "}"
 ],
 "type": "text/javascript"
 }
 }
 ],
 "request": {
 "method": "GET",
 "header": [],
 "url": {
 "raw": "https://www.google.com",
 "protocol": "https",
 "host": [
 "www",
 "google",
 "com"
 ]
 }
 },
 "response": []
 },
 {
 "name": "Get Youtube",
 "event": [
 {
 "listen": "test",
 "script": {
 "exec": [
 "postman.setNextRequest(null);"
 ],
 "type": "text/javascript"
 }
 }
 ],
 "request": {
 "method": "GET",
 "header": [],
 "url": {
 "raw": "https://www.youtube.com/",
 "protocol": "https",
 "host": [
 "www",
 "youtube",
 "com"
 ],
 "path": [
 ""
 ]
 }
 },
 "response": []
 },
 {
 "name": "Get Google Translate",
 "event": [
 {
 "listen": "test",
 "script": {
 "exec": [
 "postman.setNextRequest(\"Get Youtube\");"
 ],
 "type": "text/javascript"
 }
 }
 ],
 "request": {
 "method": "GET",
 "header": [],
 "url": {
 "raw": "https://translate.google.com/",
 "protocol": "https",
 "host": [
 "translate",
 "google",
 "com"
 ],
 "path": [
 ""
 ]
 }
 },
 "response": []
 }
 ]
 }
和之前一樣,我們可以使用 Collection Runner 來執行這個自定義流程。
4.使用紐曼亞軍
我們可以使用Newman CLI 實用程序通過命令行運行 Postman 集合。採用這種方法為自動化開闢了更廣泛的機會。
讓我們使用它為我們現有的集合運行自定義流程的兩次迭代:
newman run -n2 "Custom Flow Google Apps - Load Testing.postman_collection.json"一旦所有迭代結束,我們將獲得一個統計摘要,我們可以在其中看到請求的平均響應時間:
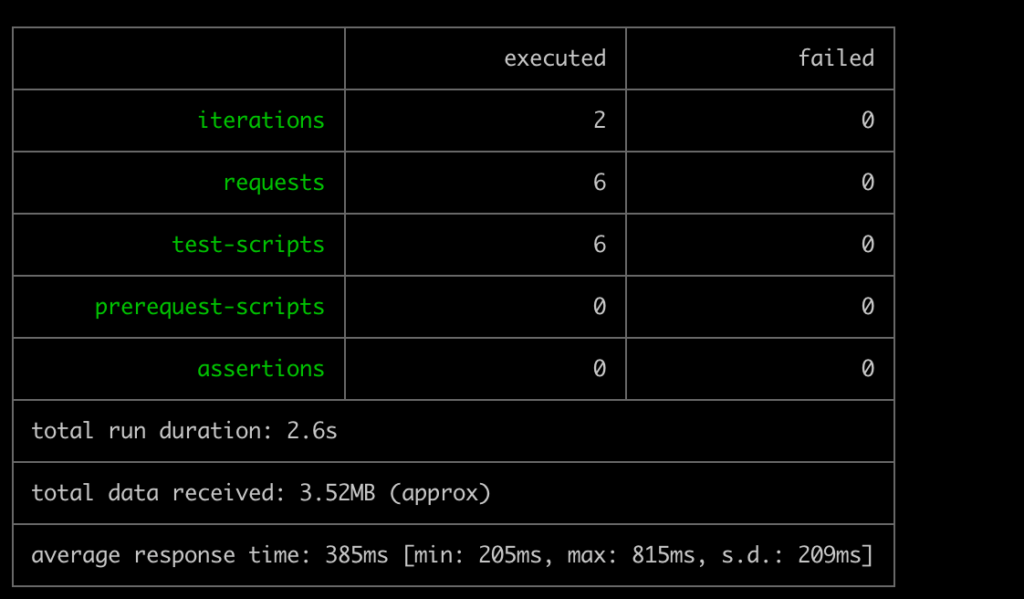
我們必須注意,我們故意使用較低的值進行演示,因為大多數現代服務都有一個速率限制和請求阻止邏輯,它將開始阻止我們對更高值或持續時間的請求。
5. 使用 Grafana k6
Postman 是製定請求收集和執行流程的最簡單方法。但是,在使用 Postman 或 Newman 時,我們會一個接一個地依次調用請求。
在實際場景中,我們需要針對同時來自多個用戶的請求測試我們的系統。對於這樣的用例,我們可以使用Grafana 的 k6實用程序。
首先,我們需要將現有的 Postman 集合轉換為與 k6 兼容的格式。我們可以為這個里程碑使用[postman-to-k6](https://github.com/apideck-libraries/postman-to-k6)庫:
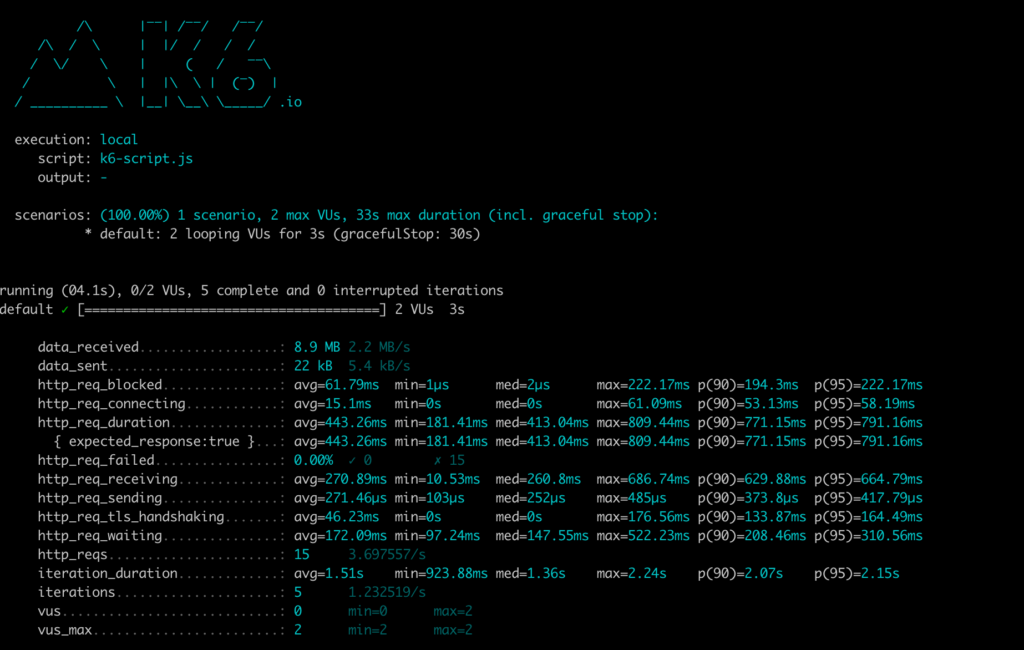
postman-to-k6 "Google Apps - Load Testing.json" -o k6-script.js接下來,讓我們對兩個虛擬用戶進行三秒鐘的實時運行:
k6 run --duration 3s --vus 2 k6-script.js完成後,我們會得到一份詳細的統計報告,其中顯示了平均響應時間、迭代次數等指標:
六,結論
在本教程中,我們利用 Postman 集合使用 GUI 和 Newman 運行器進行基本負載測試。此外,我們了解了可用於對 Postman 集合中的請求進行高級負載測試的 k6 實用程序。