Lucene Field選項
Field 是最重要的和索引進程的基礎單元。它是要索引包含的內容的實際對象。當我們添加一個字段,Lucene提供使用Field 項字段,其中規定字段是要搜索的許多控制。
我們添加包含字段IndexWriter,IndexWriter用於更新或創建索引文件。
現在,我們將展示一個循序漸進的過程,以獲得一個開始在使用基本的例子,在不同 Field 選項的理解。
各種Field選項
Index.ANALYZED - 先分析然後做索引。用於普通的文本索引。分析儀將打斷該字段的值轉換成標記流,每個令牌是搜索分開。
Index.NOT_ANALYZED - 不分析,但這樣做索引。用於完整的文本索引,例如人的名字,URL等。
Index.ANALYZED_NO_NORMS - 變式Index.ANALYZED。分析儀將打破該字段的值轉換成標記流,每個令牌是搜索分開,但規範是不存儲在indexes.NORMS被用來提高搜索但有時內存消耗。
Index.Index.NOT_ANALYZED_NO_NORMS - 變式Index.NOT_ANALYZED。索引是這樣做,但規範NORMS是不存儲在索引。
Index.NO - 字段值不搜索。
使用Field選項
創建一個方法來從文本獲取Lucene的文檔。
創建各種類型的是含有鍵作爲名稱和值作爲內容被編入索引鍵值對字段。
設置字段進行分析與否。在這裏,只有內容是要被分析,因爲它可能包含數據,諸如,a, am, are, an等它不要求在搜索操作等等。
新創建的字段添加到文檔對象並返回給調用者的方法。
private Document getDocument(File file) throws IOException{ Document document = new Document(); //index file contents Field contentField = new Field(LuceneConstants.CONTENTS, new FileReader(file)); //index file name Field fileNameField = new Field(LuceneConstants.FILE_NAME, file.getName(), Field.Store.YES,Field.Index.NOT_ANALYZED); //index file path Field filePathField = new Field(LuceneConstants.FILE_PATH, file.getCanonicalPath(), Field.Store.YES,Field.Index.NOT_ANALYZED); document.add(contentField); document.add(fileNameField); document.add(filePathField); return document; }
應用程序示例
讓我們創建一個測試Lucene的應用程序來測試索引處理。
步驟
描述
1
創建一個LuceneFirstApplication在包packagecom.yiibai.lucene下。也可以使用EJB創建的項目
2
創建LuceneConstants.java,TextFileFilter.java和Indexer.java。保持其它的文件不變。
3
創建LuceneTester.java如下所述。
4
清理和構建應用程序,以確保業務邏輯按要求工作。
LuceneConstants.java
這個類是用來提供可應用於示例應用程序中使用的各種常量。
package com.yiibai.lucene; public class LuceneConstants { public static final String CONTENTS="contents"; public static final String FILE_NAME="filename"; public static final String FILE_PATH="filepath"; public static final int MAX_SEARCH = 10; }
TextFileFilter.java
此類用於 .txt文件過濾器。
package com.yiibai.lucene; import java.io.File; import java.io.FileFilter; public class TextFileFilter implements FileFilter { @Override public boolean accept(File pathname) { return pathname.getName().toLowerCase().endsWith(".txt"); } }
Indexer.java
這個類是用於索引的原始數據,這樣我們就可以使用Lucene庫,使其可搜索。
package com.yiibai.lucene; import java.io.File; import java.io.FileFilter; import java.io.FileReader; import java.io.IOException; import org.apache.lucene.analysis.standard.StandardAnalyzer; import org.apache.lucene.document.Document; import org.apache.lucene.document.Field; import org.apache.lucene.index.CorruptIndexException; import org.apache.lucene.index.IndexWriter; import org.apache.lucene.store.Directory; import org.apache.lucene.store.FSDirectory; import org.apache.lucene.util.Version; public class Indexer { private IndexWriter writer; public Indexer(String indexDirectoryPath) throws IOException{ //this directory will contain the indexes Directory indexDirectory = FSDirectory.open(new File(indexDirectoryPath)); //create the indexer writer = new IndexWriter(indexDirectory, new StandardAnalyzer(Version.LUCENE_36),true, IndexWriter.MaxFieldLength.UNLIMITED); } public void close() throws CorruptIndexException, IOException{ writer.close(); } private Document getDocument(File file) throws IOException{ Document document = new Document(); //index file contents Field contentField = new Field(LuceneConstants.CONTENTS, new FileReader(file)); //index file name Field fileNameField = new Field(LuceneConstants.FILE_NAME, file.getName(), Field.Store.YES,Field.Index.NOT_ANALYZED); //index file path Field filePathField = new Field(LuceneConstants.FILE_PATH, file.getCanonicalPath(), Field.Store.YES,Field.Index.NOT_ANALYZED); document.add(contentField); document.add(fileNameField); document.add(filePathField); return document; } private void indexFile(File file) throws IOException{ System.out.println("Indexing "+file.getCanonicalPath()); Document document = getDocument(file); writer.addDocument(document); } public int createIndex(String dataDirPath, FileFilter filter) throws IOException{ //get all files in the data directory File[] files = new File(dataDirPath).listFiles(); for (File file : files) { if(!file.isDirectory() && !file.isHidden() && file.exists() && file.canRead() && filter.accept(file) ){ indexFile(file); } } return writer.numDocs(); } }
LuceneTester.java
這個類是用來測試Lucene庫的索引能力。
package com.yiibai.lucene; import java.io.IOException; public class LuceneTester { String indexDir = "E:\Lucene\Index"; String dataDir = "E:\Lucene\Data"; Indexer indexer; public static void main(String[] args) { LuceneTester tester; try { tester = new LuceneTester(); tester.createIndex(); } catch (IOException e) { e.printStackTrace(); } } private void createIndex() throws IOException{ indexer = new Indexer(indexDir); int numIndexed; long startTime = System.currentTimeMillis(); numIndexed = indexer.createIndex(dataDir, new TextFileFilter()); long endTime = System.currentTimeMillis(); indexer.close(); System.out.println(numIndexed+" File indexed, time taken: " +(endTime-startTime)+" ms"); } }
數據和索引目錄的創建
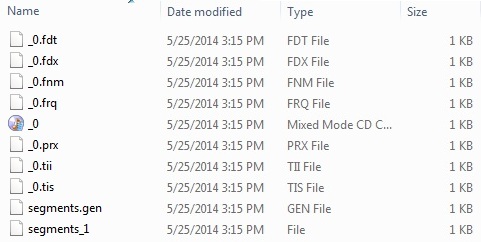
使用10個文件從 record1.txt 到 record10.txt 的文本文件包含簡單的名稱以及學生的其他細節,並把它們放在目錄 E:LuceneData。這些數據用於測試。索引目錄路徑應創建爲E:LuceneIndex。運行此程序後,就可以看到該文件夾中創建的索引文件的列表。
運行程序:
一旦創建源,創造了原始數據,數據目錄和索引目錄來完成,準備好這一步是編譯和運行程序。要做到這一點,在LuceneTester.Java文件選項卡中使用Eclipse IDE 的Run選項,或使用Ctrl+ F11來編譯和運行應用程序LuceneTester。如果應用程序一切正常,將在Eclipse IDE控制檯打印以下消息:
Indexing E:LuceneData
ecord1.txt
Indexing E:LuceneData
ecord10.txt
Indexing E:LuceneData
ecord2.txt
Indexing E:LuceneData
ecord3.txt
Indexing E:LuceneData
ecord4.txt
Indexing E:LuceneData
ecord5.txt
Indexing E:LuceneData
ecord6.txt
Indexing E:LuceneData
ecord7.txt
Indexing E:LuceneData
ecord8.txt
Indexing E:LuceneData
ecord9.txt
10 File indexed, time taken: 109 ms
一旦成功地運行程序,將有以下的索引目錄中的內容: