JanusGraph 簡介
1. 簡介
在本教程中,我們將研究JanusGraph 和 Gremlin 。
JanusGraph 是一個開源、可大規模擴展的圖形資料庫。它被設計用於支援巨大的圖表——大到需要多個資料庫節點協同工作——同時仍然允許我們有效地使用它們。
這是透過根據需要在其他得到良好支援的技術之上進行建置來實現的 - 例如 Cassandra、HBase、Elasticsearch。我們還與Apache TinkerPop堆疊實現了本機集成,包括Gremlin控制台和查詢語言。
2.運行 JanusGraph 和 Gremlin
要在本機上運行 JanusGraph,我們首先需要下載最新版本,也就是撰寫本文時的版本 1.1.0。下載完成後,我們可以解壓縮並準備運行。這需要已經安裝 Java 8+ JVM。
解壓縮後,我們可以透過從解壓縮後的目錄中執行./bin/gremlin.sh或./bin/gremlin.bat來啟動 Gremlin 會話:
-> % ./bin/gremlin.sh


 \,,,/

 (oo)

 -----oOOo-(3)-oOOo-----

 plugin activated: tinkerpop.server

 plugin activated: tinkerpop.tinkergraph

 08:45:56 INFO org.apache.tinkerpop.gremlin.hadoop.jsr223.HadoopGremlinPlugin.getCustomizers - HADOOP_GREMLIN_LIBS is set to: /Users/baeldung/janusgraph-1.1.0/lib

 08:45:56 WARN org.apache.hadoop.util.NativeCodeLoader.<clinit> - Unable to load native-hadoop library for your platform... using builtin-java classes where applicable

 plugin activated: tinkerpop.hadoop

 plugin activated: tinkerpop.spark

 plugin activated: tinkerpop.utilities

 plugin activated: janusgraph.imports
如果需要,這個 Gremlin 實例能夠在進程中託管 JanusGraph 資料庫,這對於測試非常有用。我們可以使用JanusGraphFactory.open指令來存取它,指向適當的設定檔:
gremlin> graph = JanusGraphFactory.open('conf/janusgraph-inmemory.properties')

 08:46:06 INFO org.apache.commons.beanutils.FluentPropertyBeanIntrospector.introspect - Error when creating PropertyDescriptor for public final void org.apache.commons.configuration2.AbstractConfiguration.setProperty(java.lang.String,java.lang.Object)! Ignoring this property.

 08:46:06 INFO org.janusgraph.diskstorage.configuration.builder.ReadConfigurationBuilder.setupTimestampProvider - Set default timestamp provider MICRO

 08:46:06 INFO org.janusgraph.graphdb.idmanagement.UniqueInstanceIdRetriever.getOrGenerateUniqueInstanceId - Generated unique-instance-id=c0a801777851

 08:46:06 INFO org.janusgraph.diskstorage.configuration.ExecutorServiceBuilder.buildFixedExecutorService - Initiated fixed thread pool of size 16

 08:46:06 INFO org.janusgraph.graphdb.database.StandardJanusGraph.<init> - Gremlin script evaluation is disabled

 08:46:06 INFO org.janusgraph.diskstorage.log.kcvs.KCVSLog$MessagePuller.initializeTimepoint - Loaded unidentified ReadMarker start time 2025-02-24T08:46:06.291970Z into org.janusgraph.diskstorage.log.kcvs.KCVSLog$MessagePuller@21eedcde

==>standardjanusgraph[inmemory:[127.0.0.1]]這將在我們的客戶端創建一個新的graph變數。這代表我們的圖形資料庫,並將作為所有未來呼叫的入口點。
我們可以使用許多標準設定檔來用於不同的儲存和索引後端,但janusgraph-inmemory.properties檔案是最簡單的。這將配置一個沒有持久性的記憶體資料庫。
2.1.獨立伺服器
或者,我們可以使用./bin/janusgraph-server.sh start指令啟動獨立的 JanusGraph 伺服器:
-> % ./bin/janusgraph-server.sh start

 /Users/baeldung/janusgraph-1.1.0/conf/gremlin-server/gremlin-server.yaml will be used to start JanusGraph Server in background

 Server started 8163
預設情況下,這將啟動在連接埠 8182 上運行的伺服器,並使用相同的janusgraph-inmemory.properties檔案運行。但是,因為這現在是一個正在運行的伺服器,所以我們可以將客戶端連接到它。
我們可以使用:remote connect指令將 Gremlin 用戶端指向遠端伺服器:
gremlin> :remote connect tinkerpop.server conf/remote.yaml session

 08:54:19 INFO org.apache.tinkerpop.gremlin.driver.Connection.<init> - Created new connection for ws://localhost:8182/gremlin

 08:54:19 INFO org.apache.tinkerpop.gremlin.driver.ConnectionPool.<init> - Opening connection pool on Host{address=localhost/127.0.0.1:8182, hostUri=ws://localhost:8182/gremlin} with core size of 1

 ==>Configured localhost/127.0.0.1:8182-[96b90c45-4aef-405d-a336-5823bcde3995]
完成後,我們還需要告訴 Gremlin 將所有命令傳送到遠端伺服器:
gremlin> :remote console

 ==>All scripts will now be sent to Gremlin Server - [localhost/127.0.0.1:8182]-[96b90c45-4aef-405d-a336-5823bcde3995] - type ':remote console' to return to local mode
此時,我們所做的任何事情都將與該遠端伺服器一起進行。
請注意,在執行此操作時,我們不需要分配graph變數——這是隱式完成的,以指向我們連接到的資料庫伺服器。
3.圖結構
JanusGraph 等圖形資料庫以圖形形式表示資料。這意味著我們擁有頂點和連接它們的邊的組合。
在 JanusGraph 中,邊恰好連接到兩個頂點並且具有方向——它們始終從一個頂點指向另一個頂點。因此,這些始終是有向圖。但是,它們不必是非循環的——我們的頂點之間可以有任意長度的循環。
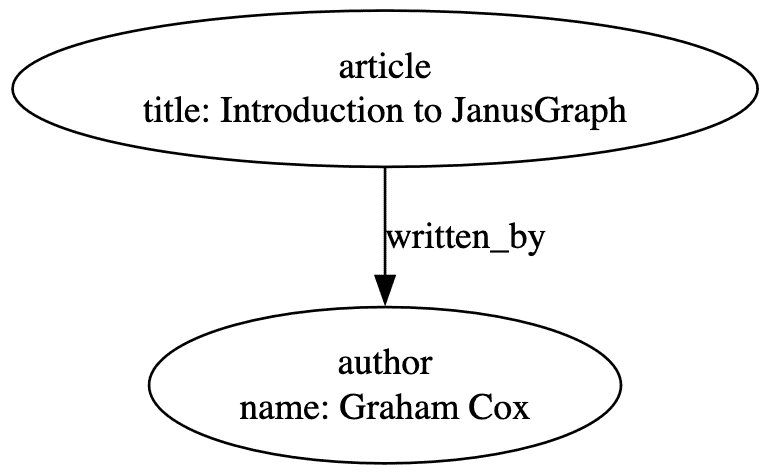
我們將資料庫中的資料表示為頂點和邊上的標籤和屬性。邊必須有標籤,頂點也可以有標籤。這定義了我們所代表的資料類型 - 例如“article”或“written_by”。此外,我們可以在每個頂點或邊上擁有任意數量的鍵/值對 - 例如「標題:JanusGraph 簡介」。
4. 載入範例數據
Gremlin CLI 隨附一個特殊的工廠,可以將一些範例資料載入到資料庫中:
gremlin> GraphOfTheGodsFactory.loadWithoutMixedIndex(graph, true)

 ==>null
這將載入一個名為「The Graph Of The Gods」的範例資料集:
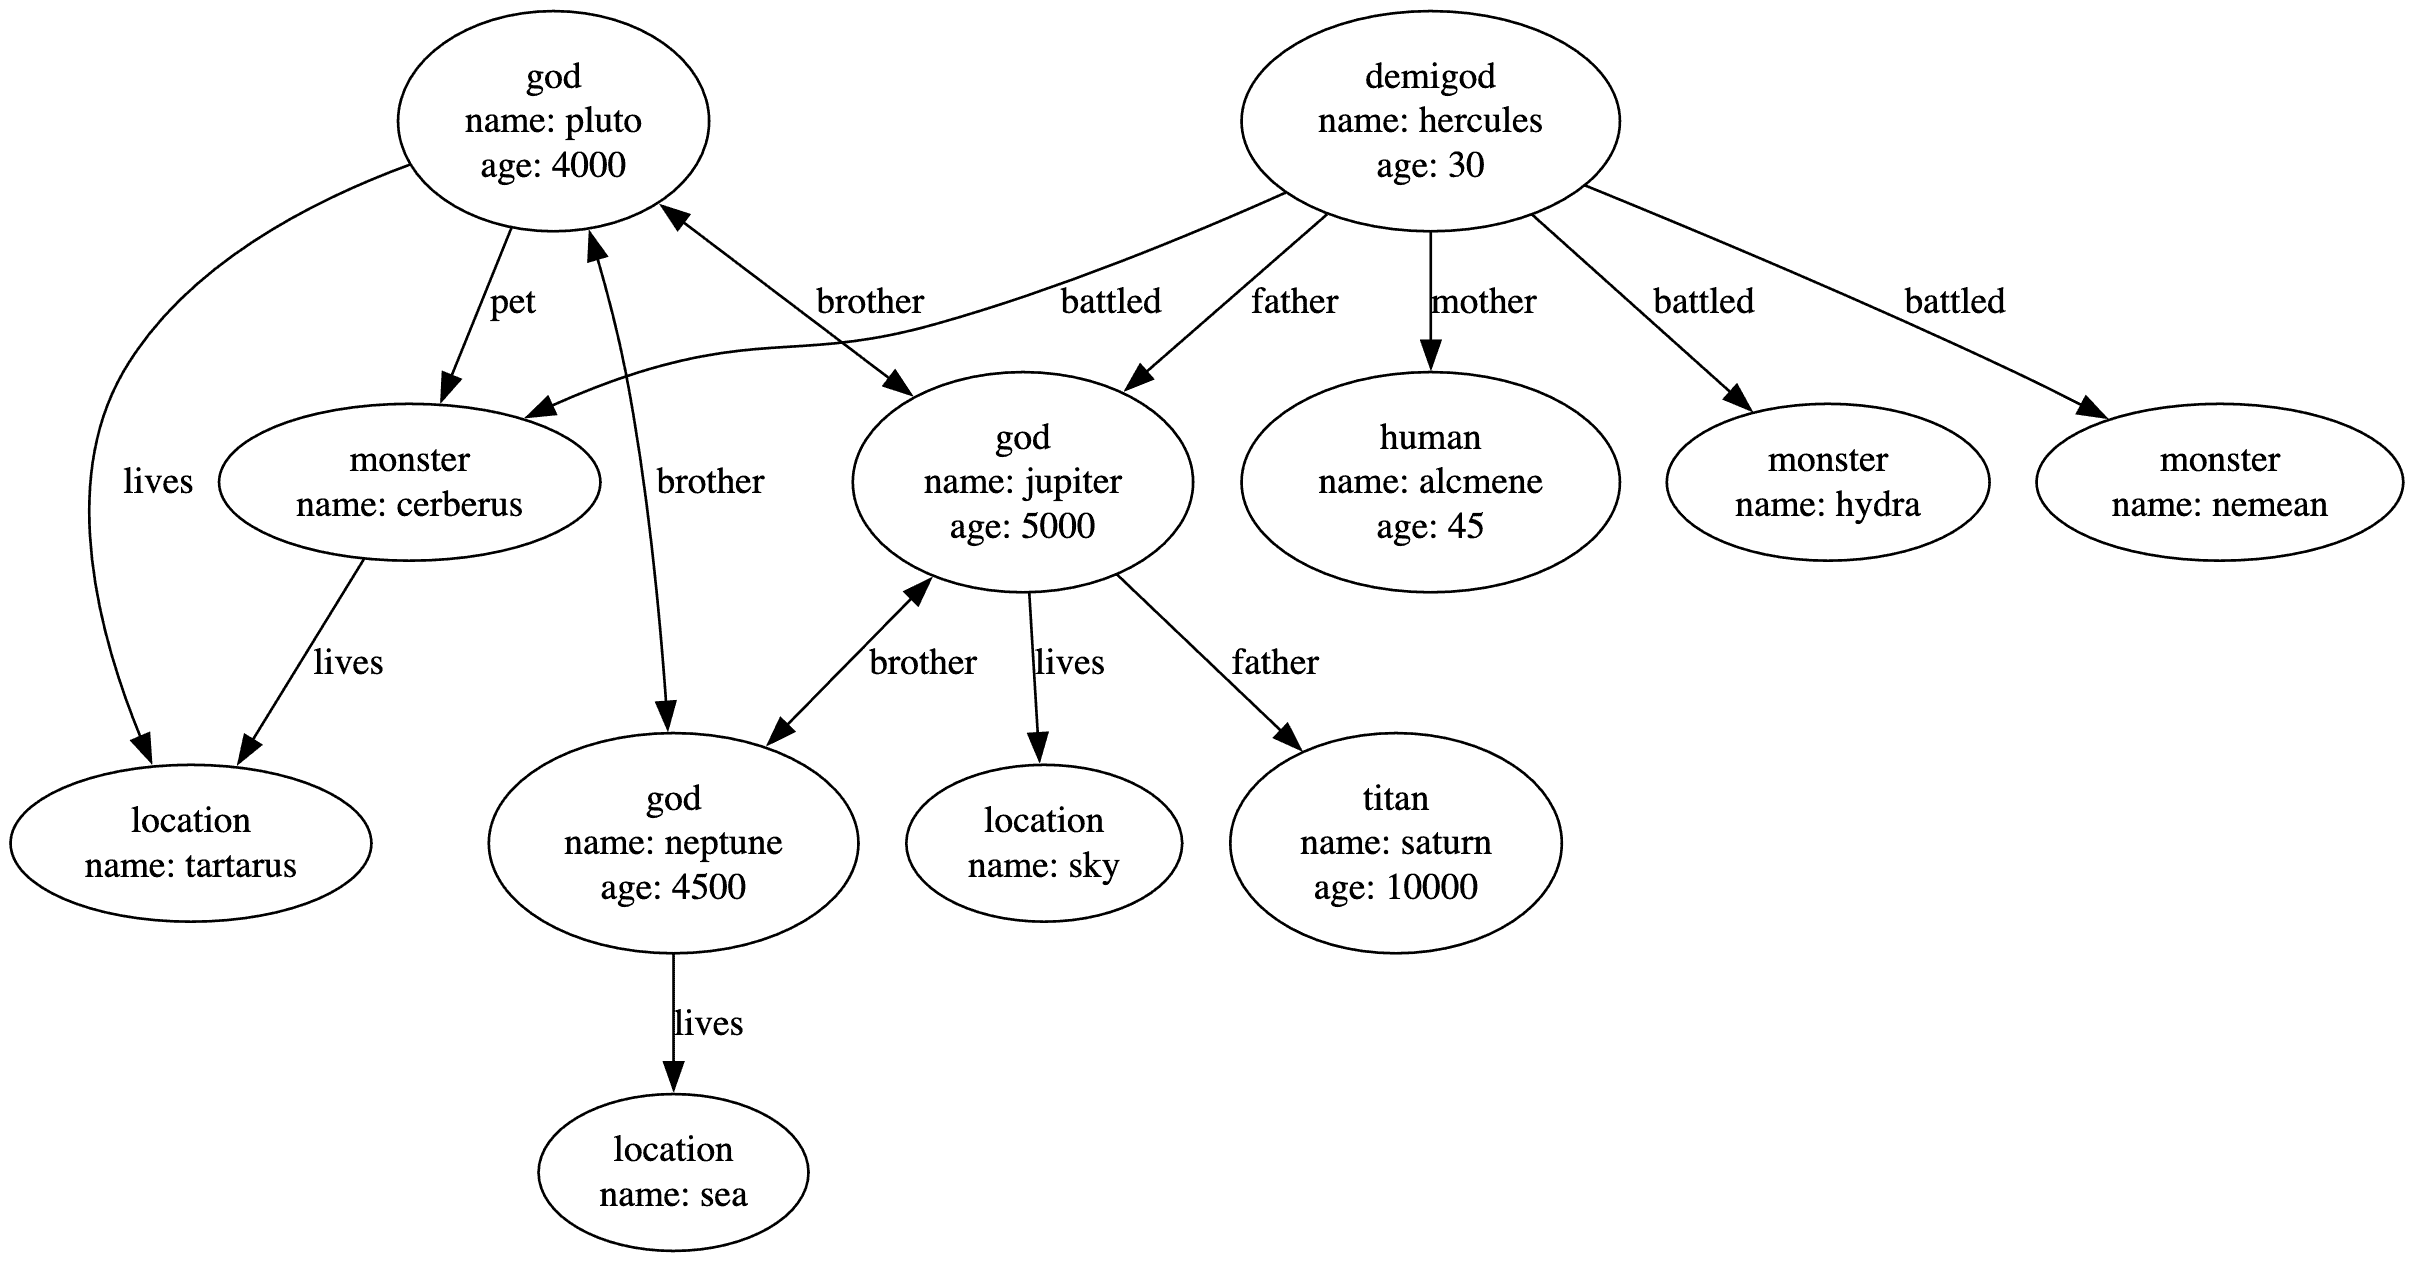
這代表了羅馬萬神殿的一小部分及其相關數據,但足以示範如何使用 JanusGraph。
5.查詢數據
現在我們有一個包含範例資料的資料庫,我們可以查詢它了。
在此之前我們需要建立一個遍歷來源:
gremlin> g = graph.traversal()

==>graphtraversalsource[standardjanusgraph[inmemory:[127.0.0.1]], standard]這將建立一個新變數g作為遍歷圖形資料的入口點。
5.1.查詢頂點
我們可以做的第一件事是查詢單一頂點。
最簡單的形式是列出每個頂點而不進行任何過濾。 g變數上的V()函數使我們能夠存取以下內容:
gremlin> gV()

 08:13:56 WARN org.janusgraph.graphdb.transaction.StandardJanusGraphTx$3.execute - Query requires iterating over all vertices [[]]. For better performance, use indexes

 ==>v[4136]

 ==>v[8232]

 ==>v[12328]

 ==>v[4184]

 ==>v[8280]

 ==>v[4216]

 ==>v[8312]

 ==>v[12408]

 ==>v[4256]

 ==>v[4288]

 ==>v[8384]

==>v[4304]但是,這並不是很有用。我們也可以對這些頂點進行過濾,只保留符合特定標準的頂點。例如,我們可以使用has()函數過濾出具有特定屬性的頂點:
gremlin> gV().has('name', 'hercules')

 ==>v[4136]
了解有關返回的頂點的更多資訊也很有用。到目前為止我們僅取得內部 ID。如果需要,我們可以看到返回頂點的整個值圖:
gremlin> gV().has('name', 'hercules').valueMap()

 ==>[name:[hercules],age:[30]]
或者我們可以獲得個人詳細資訊:
gremlin> gV().has('name', 'hercules').label()

 ==>demigod

 gremlin> gV().has('name', 'hercules').values('name')

 ==>hercules
我們也可以將查詢結果指派給變數以供日後使用:
gremlin> hercules = gV().has('name', 'hercules').next()

==>v[4128]我們在這裡使用next()呼叫來傳回實際的頂點參考而不是圖遍歷。我們需要它以便稍後引用它:
gremlin> gV(hercules).valueMap()

 ==>[name:[hercules],age:[30]]
5.2.遍歷邊
如果不能遍歷邊,將我們的資料表示為圖形就沒有任何好處。
我們使用in()和out()函數來遍歷查詢中的邊 - 取決於我們想要遍歷的邊的方向。當使用out()時,這將遵循從相關節點指出的邊:
gremlin> gV().has('name', 'hercules').out('father').valueMap()

==>[name:[jupiter],age:[5000]]同樣,當使用in()時,這將遵循指向節點的邊:
gremlin> gV().has('name', 'jupiter').in('father').valueMap()

 ==>[name:[hercules],age:[30]]
這也將允許我們正確地遍歷有許多匹配邊需要追蹤的情況:
gremlin> gV().has('name', 'hercules').out('battled').valueMap()

 ==>[name:[cerberus]]

 ==>[name:[hydra]]

==>[name:[nemean]]因此,我們可能需要進一步過濾這些。與以前一樣,這是使用has()函數完成的:
gremlin> gV().has('name', 'hercules').out('battled').has('name', 'hydra').valueMap()

 ==>[name:[hydra]]
毫不奇怪,我們也可以根據需要盡可能遵循這些,以便進行更複雜的發現:
gremlin> gV().has('name', 'hercules').out('battled').out('lives').in('lives').valueMap()

 ==>[name:[cerberus]]

 ==>[name:[pluto],age:[4000]]
此查詢將:
- 找到名為“hercules”的頂點。
- 從此節點開始,追蹤所有標記為「戰鬥」的傳出邊。
- 從結果頂點開始追蹤所有標記為「生命」的傳出邊。
- 跟隨所有標記為「生命」的傳入邊進入結果頂點。
這樣實際上就讓每個人都生活在與赫拉克勒斯戰鬥的怪物相同的位置。
6. 新增和編輯數據
能夠查詢我們的資料很重要,但如果我們不能操縱它那麼它就沒有多大用處。
我們可以使用graph.addVertex()呼叫來為我們的圖中新增新的頂點:
gremlin> theseus = graph.addVertex('human')

==>v[16552]請注意,因為這是在graph本身上調用的而不是圖遍歷,所以我們直接得到了新的頂點。
我們也可以在addVertex()呼叫中指定一些屬性:
gremlin> theseus = graph.addVertex(T.label, 'human', 'name', 'theseus')

==>v[12528]由於頂點標籤是可選的,因此它們在此呼叫中表示為具有特殊名稱T.label的屬性。
我們稍後可以使用property()呼叫來更新此頂點的屬性:
gremlin> theseus.property('name', 'theseus')

==>vp[name->theseus]我們也可以使用addEdge()方法來建立邊:
gremlin> cerberus = gV().has('name', 'cerberus').next()

 ==>v[12496]

 gremlin> theseus.addEdge('met', cerberus)

 08:00:36 INFO org.janusgraph.graphdb.relations.RelationIdentifier.<clinit> - Use default relation delimiter: -

 ==>e[3z2-9o0-hed-9n4][12528-met->12496]
我們現在可以利用這些來查詢我們的資料:
gremlin> gV().has('name', 'theseus').out('met').valueMap()

 ==>[name:[cerberus]]
7. 結論
在本文中,我們簡要介紹了 JanusGraph 以及它可以做些什麼。使用這個資料庫可以實現更多功能,因此下次您需要使用圖形資料庫時,為什麼不看看呢?