Spring Cloud –添加Angular 4
1.概述
在上一篇Spring Cloud文章中,我們將Zipkin支持添加到了應用程序中。在本文中,我們將向堆棧中添加一個前端應用程序。
到目前為止,我們一直在後端上完全構建我們的雲應用程序。但是,如果沒有UI,Web應用程序有什麼好處?在本文中,我們將通過將單個頁面應用程序集成到我們的項目中來解決該問題。
我們將使用Angular和Bootstrap編寫此應用程序。 Angular 4代碼的風格非常像編寫Spring應用程序,這對於Spring開發人員來說是自然的選擇!儘管前端代碼將使用Angular,但本文的內容可以輕鬆地擴展到任何前端框架,而無需花費太多精力。
在本文中,我們將構建一個Angular 4應用並將其連接到我們的雲服務。我們將演示如何在SPA和Spring Security之間集成登錄。我們還將展示如何使用Angular對HTTP通信的支持來訪問應用程序的數據。
2.網關變更
有了適當的前端,我們將切換到基於表單的登錄並將UI的安全部分提供給特權用戶。這需要更改我們的網關安全配置。
2.1。更新HttpSecurity
首先,讓我們更新網關SecurityConfig.java類中的configure(HttpSecurity http)方法:
@Override

 protected void configure(HttpSecurity http) {

 http

 .formLogin()

 .defaultSuccessUrl("/home/index.html", true)

 .and()

 .authorizeRequests()

 .antMatchers("/book-service/**", "/rating-service/**", "/login*", "/")

 .permitAll()

 .antMatchers("/eureka/**").hasRole("ADMIN")

 .anyRequest().authenticated()

 .and()

 .logout()

 .and()

 .csrf().disable();

}首先,我們添加一個默認的成功URL指向/home/index.html因為這將是Angular應用程序所在的位置。接下來,我們配置螞蟻匹配器以允許通過網關的任何請求,但Eureka資源除外。這會將所有安全檢查委派給後端服務。
接下來,我們刪除了註銷成功URL,因為默認重定向回登錄頁面將可以正常工作。
2.2。添加主要端點
接下來,讓我們添加一個端點以返回經過身份驗證的用戶。這將在我們的Angular應用程序中使用,以登錄並標識用戶所具有的角色。這將幫助我們控制他們可以在我們的網站上執行的操作。
在網關項目中,添加AuthenticationController類:
@RestController

 public class AuthenticationController {


 @GetMapping("/me")

 public Principal getMyUser(Principal principal) {

 return principal;

 }

 }
控制器將當前登錄的用戶對象返回給調用者。這為我們提供了控制Angular應用所需的所有信息。
2.3。添加登陸頁面
讓我們添加一個非常簡單的登錄頁面,以便用戶在進入應用程序的根目錄時可以看到一些內容。
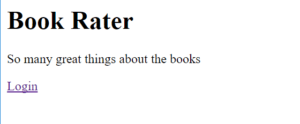
在src/main/resources/static,我們添加一個index.html文件,其中包含指向登錄頁面的鏈接:
<!DOCTYPE html>

 <html lang="en">

 <head>

 <meta charset="UTF-8">

 <title>Book Rater Landing</title>

 </head>

 <body>

 <h1>Book Rater</h1>

 <p>So many great things about the books</p>

 <a href="/login">Login</a>

 </body>

 </html>
3. Angular CLI和Starter項目
在開始新的Angular項目之前,請確保安裝最新版本的Node.js和npm 。
3.1。安裝Angular CLI
首先,我們需要使用npm下載並安裝Angular命令行界面。打開一個終端並運行:
npm install -g @angular/cli這將在全球範圍內下載並安裝CLI。
3.2。安裝新項目
仍然在終端中時,導航到網關項目並進入gateway / src / main文件夾。創建一個名為“ angular”的目錄並導航至該目錄。從這裡運行:
ng new ui耐心一點; CLI會建立一個全新的項目,並使用npm下載所有JavaScript依賴項。花費幾分鐘的時間並不少見。
ng命令是Angular CLI的快捷方式, new參數指示CLI創建一個新項目,而ui命令為我們的項目命名。
3.3。運行項目
new命令完成後。導航到已創建並運行的ui文件夾:
ng serve項目建立後,導航至http:// localhost:4200。我們應該在瀏覽器中看到:
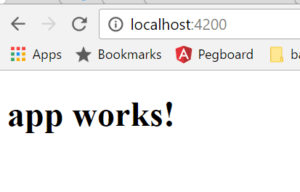
恭喜你!我們剛剛構建了一個Angular應用程序!
3.4。安裝引導程序
讓我們使用npm安裝引導程序。在ui目錄中運行以下命令:
npm install [email protected] --save這會將引導程序下載到node_modules文件夾中。
在ui目錄中,打開.angular-cli.json文件。這是配置有關我們項目的某些屬性的文件。找到apps > styles屬性,並添加我們的Bootstrap CSS類的文件位置:
"styles": [

 "styles.css",

 "../node_modules/bootstrap/dist/css/bootstrap.min.css"

 ],
這將指示Angular將Bootstrap包含在由項目構建的已編譯CSS文件中。
3.5。設置構建輸出目錄
接下來,我們需要告訴Angular構建文件的放置位置,以便我們的Spring Boot應用程序可以為它們提供服務。 Spring Boot可以從resources文件夾中的兩個位置提供文件:
- src / main / resources / static
- src / main / resource / public
由於我們已經在使用靜態文件夾為Eureka提供一些資源,並且每次運行構建時Angular都會刪除此文件夾,因此讓我們將Angular應用構建到公用文件夾中。
再次打開.angular-cli.json文件,然後找到apps > outDir屬性。更新該string:
"outDir": "../../resources/static/home",如果Angular項目位於src / main / angular / ui中,則它將構建到src / main / resources / public文件夾中。如果應用程序在另一個文件夾中,則需要修改此字符串以正確設置位置。
3.6。使用Maven自動化構建
最後,我們將建立一個自動構建,以便在編譯代碼時運行。每當運行“ mvn compile”時,此ant任務就會運行Angular CLI構建任務。將這一步添加到網關的POM.xml中,以確保每次編譯時,我們都會獲得最新的ui更改:
<plugin>

 <artifactId>maven-antrun-plugin</artifactId>

 <executions>

 <execution>

 <phase>generate-resources</phase>

 <configuration>

 <tasks>

 <exec executable="cmd" osfamily="windows"

 dir="${project.basedir}/src/main/angular/ui">

 <arg value="/c"/>

 <arg value="ng"/>

 <arg value="build"/>

 </exec>

 <exec executable="/bin/sh" osfamily="mac"

 dir="${project.basedir}/src/main/angular/ui">

 <arg value="-c"/>

 <arg value="ng build"/>

 </exec>

 </tasks>

 </configuration>

 <goals>

 <goal>run</goal>

 </goals>

 </execution>

 </executions>

 </plugin>
我們應該注意,此設置確實要求Angular CLI在類路徑上可用。將此腳本推送到不具有該依賴項的環境將導致構建失敗。
現在開始構建Angular應用程序!
4. Angular
在本教程的這一部分中,我們將在頁面中構建身份驗證機制。我們使用基本身份驗證並遵循簡單的流程使其工作。
用戶具有一個登錄表單,可以在其中輸入其用戶名和密碼。
接下來,我們使用他們的憑據來創建base64身份驗證令牌並請求“/me”端點。端點返回一個Principal對象,其中包含該用戶的角色。
最後,我們將憑據和主體存儲在客戶端上,以在後續請求中使用。
讓我們看看這是怎麼做的!
4.1。模板
在網關項目中,導航到src/main/angular/ui/src/app並打開app.component.html文件。這是Angular加載的第一個模板,將成為用戶登錄後登陸的模板。
在這裡,我們將添加一些代碼以顯示帶有登錄表單的導航欄:
<nav class="navbar navbar-toggleable-md navbar-inverse fixed-top bg-inverse">

 <button class="navbar-toggler navbar-toggler-right" type="button"

 data-toggle="collapse" data-target="#navbarCollapse"

 aria-controls="navbarCollapse" aria-expanded="false"

 aria-label="Toggle navigation">

 <span class="navbar-toggler-icon"></span>

 </button>

 <a class="navbar-brand" href="#">Book Rater

 <span *ngIf="principal.isAdmin()">Admin</span></a>

 <div class="collapse navbar-collapse" id="navbarCollapse">

 <ul class="navbar-nav mr-auto">

 </ul>

 <button *ngIf="principal.authenticated" type="button"

 class="btn btn-link" (click)="onLogout()">Logout</button>

 </div>

 </nav>


 <div class="jumbotron">

 <div class="container">

 <h1>Book Rater App</h1>

 <p *ngIf="!principal.authenticated" class="lead">

 Anyone can view the books.

 </p>

 <p *ngIf="principal.authenticated && !principal.isAdmin()" class="lead">

 Users can view and create ratings</p>

 <p *ngIf="principal.isAdmin()" class="lead">Admins can do anything!</p>

 </div>

 </div>
此代碼使用Bootstrap類設置導航欄。嵌入在欄中的是嵌入式登錄表單。 Angular使用此標記與JavaScript動態交互以呈現頁面的各個部分並控制諸如表單提交之類的事情。
諸如(ngSubmit)=”onLogin(f)”類的語句僅表示提交表單時,調用方法“onLogin(f)”並將表單傳遞給該函數。在jumbotron div中,我們有一些段落標記,這些標記將根據主體對象的狀態動態顯示。
接下來,讓我們編碼支持該模板的Typescript文件。
4.2。Typescript
在同一目錄中,打開app.component.ts文件。在此文件中,我們將添加使我們的模板功能所需的所有Typescript屬性和方法:
import {Component} from "@angular/core";

 import {Principal} from "./principal";

 import {Response} from "@angular/http";

 import {Book} from "./book";

 import {HttpService} from "./http.service";


 @Component({

 selector: 'app-root',

 templateUrl: './app.component.html',

 styleUrls: ['./app.component.css']

 })

 export class AppComponent {

 selectedBook: Book = null;

 principal: Principal = new Principal(false, []);

 loginFailed: boolean = false;


 constructor(private httpService: HttpService){}


 ngOnInit(): void {

 this.httpService.me()

 .subscribe((response: Response) => {

 let principalJson = response.json();

 this.principal = new Principal(principalJson.authenticated,

 principalJson.authorities);

 }, (error) => {

 console.log(error);

 });

 }


 onLogout() {

 this.httpService.logout()

 .subscribe((response: Response) => {

 if (response.status === 200) {

 this.loginFailed = false;

 this.principal = new Principal(false, []);

 window.location.replace(response.url);

 }

 }, (error) => {

 console.log(error);

 });

 }

}此類與Angular生命週期方法ngOnInit()掛鉤。在此方法中,我們調用/me端點以獲取用戶的當前角色和狀態。這確定了用戶在主頁上看到的內容。只要創建了此組件,就會觸發此方法,這是檢查用戶屬性在我們應用程序中的權限的絕佳時機。
我們還有一個onLogout()方法,可註銷用戶並將該頁面的狀態恢復為其原始設置。
不過這裡有些魔術。在構造函數中聲明的httpService屬性。 Angular在運行時將此屬性注入到我們的類中。 Angular管理服務類的單例實例,並使用構造函數注入將它們注入,就像Spring一樣!
接下來,我們需要定義HttpService類。
4.3。 HttpService
在同一目錄中創建一個名為“http.service.ts”的文件。在此文件中,添加以下代碼以支持登錄和註銷方法:
import {Injectable} from "@angular/core";

 import {Observable} from "rxjs";

 import {Response, Http, Headers, RequestOptions} from "@angular/http";

 import {Book} from "./book";

 import {Rating} from "./rating";


 @Injectable()

 export class HttpService {


 constructor(private http: Http) { }


 me(): Observable<Response> {

 return this.http.get("/me", this.makeOptions())

 }


 logout(): Observable<Response> {

 return this.http.post("/logout", '', this.makeOptions())

 }


 private makeOptions(): RequestOptions {

 let headers = new Headers({'Content-Type': 'application/json'});

 return new RequestOptions({headers: headers});

 }

}在此類中,我們使用Angular的DI構造注入另一個依賴項。這次是Http類。此類處理所有HTTP通信,並由框架提供給我們。
這些方法每個都使用angular的HTTP庫執行HTTP請求。每個請求還在標頭中指定一種內容類型。
現在,我們需要做一件事來使HttpService在依賴項注入系統中註冊。打開app.module.ts文件並找到provider屬性。將HttpService添加到該數組。結果應如下所示:
providers: [HttpService],4.4。添加Principal
接下來,讓我們在Typescript代碼中添加Principal DTO對象。在同一目錄中添加一個名為“ principal.ts”的文件,並添加以下代碼:
export class Principal {

 public authenticated: boolean;

 public authorities: Authority[] = [];

 public credentials: any;


 constructor(authenticated: boolean, authorities: any[], credentials: any) {

 this.authenticated = authenticated;

 authorities.map(

 auth => this.authorities.push(new Authority(auth.authority)))

 this.credentials = credentials;

 }


 isAdmin() {

 return this.authorities.some(

 (auth: Authority) => auth.authority.indexOf('ADMIN') > -1)

 }

 }


 export class Authority {

 public authority: String;


 constructor(authority: String) {

 this.authority = authority;

 }

}我們添加了Principal類和Authority類。這是兩個DTO類,非常類似於Spring應用程序中的POJO。因此,我們不需要在角度系統的DI系統中註冊這些類。
接下來,讓我們配置重定向規則,以將未知請求重定向到應用程序的根目錄。
4.5。 404處理
讓我們導航回網關服務的Java代碼。在GatewayApplication類所在的位置添加一個名為ErrorPageConfig的新類:
@Component

 public class ErrorPageConfig implements ErrorPageRegistrar {


 @Override

 public void registerErrorPages(ErrorPageRegistry registry) {

 registry.addErrorPages(new ErrorPage(HttpStatus.NOT_FOUND,

 "/home/index.html"));

 }


}此類將標識任何404響應,並將用戶重定向到“/home/index.html” 。在單頁應用程序中,這是我們處理所有不流向專用資源的流量的方式,因為客戶端應處理所有可導航的路線。
現在我們準備啟動此應用程序,看看我們構建了什麼!
4.6。構建和查看
現在從網關文件夾運行“ mvn compile ”。這將編譯我們的java源並將Angular應用構建到公用文件夾。讓我們啟動其他雲應用程序: config , discovery和zipkin 。然後運行網關項目。服務啟動後,導航至http://localhost:8080以查看我們的應用程序。我們應該看到這樣的東西:
接下來,讓我們跟隨登錄頁面的鏈接:
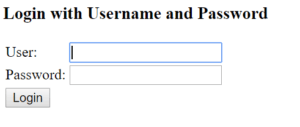
使用用戶/密碼憑據登錄。單擊“登錄”,我們應該重定向到加載我們的單頁應用程序的/home/index.html。

看來我們的jumbotron指示我們已經以用戶身份登錄!現在,通過單擊右上角的鏈接註銷,這次使用admin/admin憑據登錄。

看起來不錯!現在,我們以管理員身份登錄。
5.結論
在本文中,我們看到了將單個頁面應用程序集成到我們的雲系統中是多麼容易。我們採用了現代化的框架,並將有效的安全配置集成到了我們的應用程序中。
使用這些示例,嘗試編寫一些代碼來調用book-service或rating-service 。由於我們現在有進行HTTP調用並將數據連接到模板的示例,因此這應該相對容易一些。
如果您想了解網站其餘部分的構建方式,可以在Github上找到源代碼。