Spring Boot Zuul代理服務器和路由
Zuul Server是一個網關應用程序,可處理所有請求並執行微服務應用程序的動態路由。 Zuul服務器也稱爲邊緣服務器。
例如,/api/user映射到用戶服務,/api/products映射到產品服務,Zuul Server將請求動態路由到相應的後端應用程序。
在本章中,將詳細介紹如何在Spring Boot中創建Zuul Server應用程序。
創建Zuul服務器應用程序
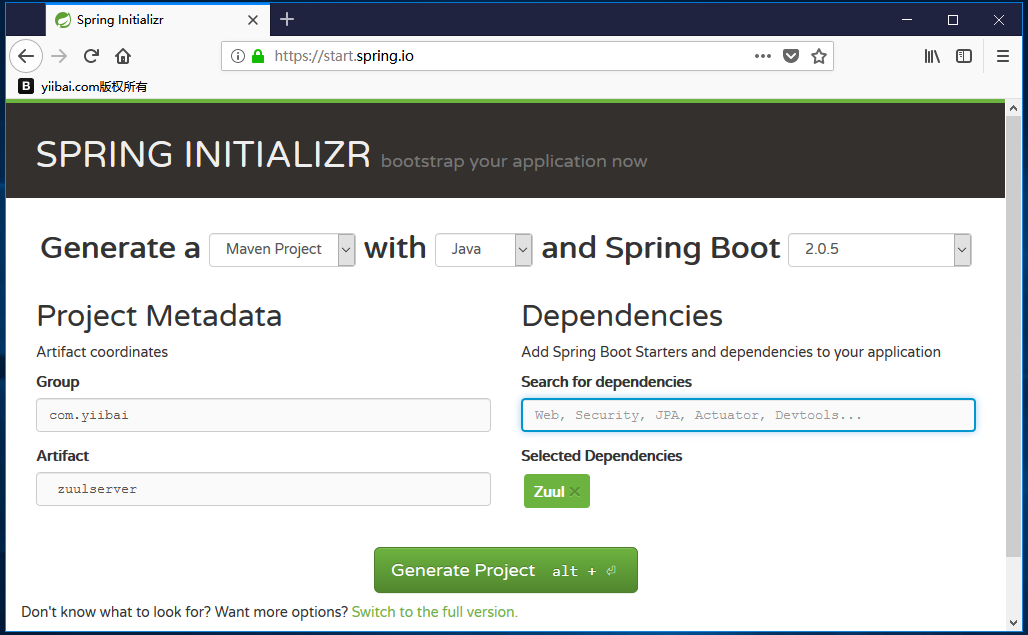
Zuul Server捆綁了Spring Cloud依賴項。可以從Spring Initializer頁面https://start.spring.io /下載Spring Boot項目,然後選擇Zuul Server依賴項。

在主Spring Boot應用程序中添加[@EnableZuulProxy](https://github.com/EnableZuulProxy "@EnableZuulProxy")註解。 [@EnableZuulProxy](https://github.com/EnableZuulProxy "@EnableZuulProxy")註釋用於使Spring Boot應用程序充當Zuul代理服務器。
package com.yiibai.zuulserver;

import org.springframework.boot.SpringApplication;
import org.springframework.boot.autoconfigure.SpringBootApplication;
import org.springframework.cloud.netflix.zuul.EnableZuulProxy;

@SpringBootApplication
@EnableZuulProxy
public class ZuulserverApplication {
   public static void main(String[] args) {
      SpringApplication.run(ZuulserverApplication.class, args);
   }
}
必須在構建配置文件中添加Spring Cloud Starter Zuul依賴項。
Maven用戶需要在pom.xml 文件中添加以下依賴項 -
<dependency>
   <groupId>org.springframework.cloud</groupId>
   <artifactId>spring-cloud-starter-zuul</artifactId>
</dependency>對於Gradle用戶,請在build.gradle 文件中添加以下依賴項 -
compile('org.springframework.cloud:spring-cloud-starter-zuul')對於Zuul路由,請在application.properties 文件或application.yml 文件中添加以下屬性。
spring.application.name = zuulserver
zuul.routes.products.path = /api/demo/**
zuul.routes.products.url = http://localhost:8080/
server.port = 8111
它表示 http 調用/api/demo/get 轉發到產品服務。 例如,/api/demo/products被轉發到/products。
yaml文件用戶可以使用如下所示的 application.yml 文件 -
server:
   port: 8111
spring:
   application:
      name: zuulserver
zuul:

routes:
   products:
      path: /api/demo/**
      url: http://localhost:8080/
注 - 在通過Zuul Proxy進行路由之前,
http://localhost:8080/應用程序應該已經運行。
完整的構建配置文件如下所示。
Maven用戶可以使用下面給出的pom.xml 文件 -
<?xml version = "1.0" encoding = "UTF-8"?>
<project xmlns = "http://maven.apache.org/POM/4.0.0"
   xmlns:xsi = "http://www.w3.org/2001/XMLSchema-instance"
   xsi:schemaLocation = "http://maven.apache.org/POM/4.0.0
   http://maven.apache.org/xsd/maven-4.0.0.xsd">

   <modelVersion>4.0.0</modelVersion>
   <groupId>com.yiibai</groupId>
   <artifactId>zuulserver</artifactId>
   <version>0.0.1-SNAPSHOT</version>
   <packaging>jar</packaging>

   <name>zuulserver</name>
   <description>Demo project for Spring Boot</description>

   <parent>
      <groupId>org.springframework.boot</groupId>
      <artifactId>spring-boot-starter-parent</artifactId>
      <version>1.5.9.RELEASE</version>
      <relativePath/> <!-- lookup parent from repository -->
   </parent>

   <properties>
      <project.build.sourceEncoding>UTF-8</project.build.sourceEncoding>
      <project.reporting.outputEncoding>UTF-8</project.reporting.outputEncoding>
      <java.version>1.8</java.version>
      <spring-cloud.version>Edgware.RELEASE</spring-cloud.version>
   </properties>

   <dependencies>
      <dependency>
         <groupId>org.springframework.cloud</groupId>
         <artifactId>spring-cloud-starter-zuul</artifactId>
      </dependency>

      <dependency>
         <groupId>org.springframework.boot</groupId>
         <artifactId>spring-boot-starter-test</artifactId>
         <scope>test</scope>
      </dependency>
   </dependencies>

   <dependencyManagement>
      <dependencies>
         <dependency>
            <groupId>org.springframework.cloud</groupId>
            <artifactId>spring-cloud-dependencies</artifactId>
            <version>${spring-cloud.version}</version>
            <type>pom</type>
            <scope>import</scope>
         </dependency>
      </dependencies>
   </dependencyManagement>

   <build>
      <plugins>
         <plugin>
            <groupId>org.springframework.boot</groupId>
            <artifactId>spring-boot-maven-plugin</artifactId>
         </plugin>
      </plugins>
   </build>
</project>Gradle用戶可以使用下面給出的build.gradle 文件 -
buildscript {
   ext {
      springBootVersion = '1.5.9.RELEASE'
   }
   repositories {
      mavenCentral()
   }
   dependencies {
      classpath("org.springframework.boot:spring-boot-gradle-plugin:${springBootVersion}")
   }
}

apply plugin: 'java'
apply plugin: 'eclipse'
apply plugin: 'org.springframework.boot'

group = 'com.yiibai'
version = '0.0.1-SNAPSHOT'
sourceCompatibility = 1.8

repositories {
   mavenCentral()
}
ext {
   springCloudVersion = 'Edgware.RELEASE'
}
dependencies {
   compile('org.springframework.cloud:spring-cloud-starter-zuul')
   testCompile('org.springframework.boot:spring-boot-starter-test')
}
dependencyManagement {
   imports {
      mavenBom "org.springframework.cloud:spring-cloud-dependencies:${springCloudVersion}"
   }
}
創建一個可執行的JAR文件,並使用下面給出的Maven或Gradle命令運行Spring Boot應用程序 -
對於Maven,可以使用下面給出的命令 -
mvn clean install在「BUILD SUCCESS」之後,可以在target目錄下找到JAR文件。
對於Gradle,可以使用下面給出的命令 -
gradle clean build在「BUILD SUCCESSFUL」 之後,可以在build/libs目錄下找到JAR文件。
現在,使用下面顯示的命令運行JAR文件 -
java –jar <JARFILE>在Tomcat端口8111上找到已啓動的應用程序。
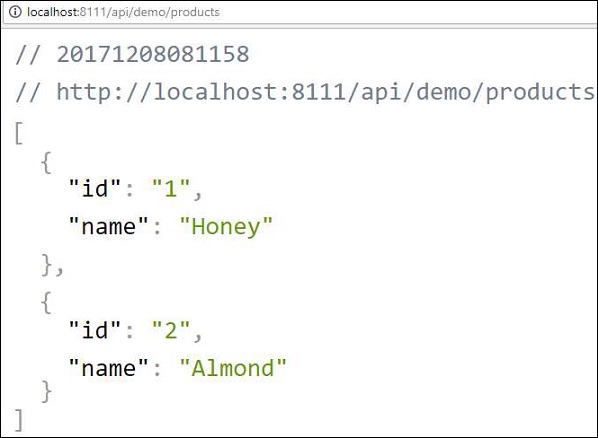
現在,在Web瀏覽器訪問URL => http://localhost:8111/api/demo/products,可看到/products REST端點的輸出,如下所示 -
