ASP.Net MVC模型綁定
ASP.NET MVC模型綁定允許您將HTTP請求數據與模型進行映射。 這是使用HTTP請求中的瀏覽器發送的數據創建.NET對象的過程。對於ASP.Net MVC而言,ASP.NET Web Forms開發人員大多都感到困惑,因爲視圖的值在到達控制類的動作方法時會如何轉換爲Model類,這個轉換由模型綁定器完成。
模型綁定是HTTP請求和 C# 操作方法之間的良好設計橋樑。 它使開發人員可以方便地使用表單(視圖)上的數據,因爲POST和GET會自動傳輸到指定的數據模型中。 ASP.NET MVC使用默認的綁定器來完成這個場景。
我們來看一個簡單的例子,在上一章的項目中添加一個「創建視圖」,我們將看到如何從視圖中獲取這些值傳到EmployeeController動作方法。
以下是POST的創建動作方法。
// POST: Employee/Create
[HttpPost]
public ActionResult Create(FormCollection collection){
   try{
      // TODO: Add insert logic here
      return RedirectToAction("Index");
   }catch{
      return View();
   }
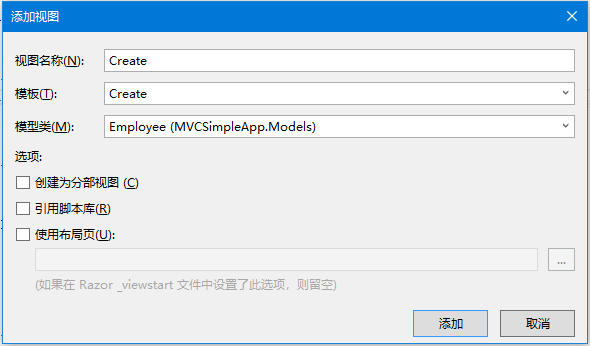
}右鍵單擊Create動作方法,然後選擇添加視圖…, 它將顯示添加視圖對話框。
如在上面的屏幕截圖中看到的那樣,默認的動作名字已經在輸入框中了。現在從「模板」下拉列表中選擇「Create」,從「模型」下拉列表中選擇「Employee」。參考下圖 -
創建的Create.cshtml 視圖中看到默認代碼如下 -
@model MVCSimpleApp.Models.Employee

@{
    Layout = null;
}

<!DOCTYPE html>

<html>
<head>
    <meta name="viewport" content="width=device-width" />
    <title>Create</title>
</head>
<body>
    @using (Html.BeginForm())
    {
        @Html.AntiForgeryToken()

        <div class="form-horizontal">
            <h4>Employee</h4>
            <hr />
            @Html.ValidationSummary(true, "", new { @class = "text-danger" })
            <div class="form-group">
                @Html.LabelFor(model => model.Name, htmlAttributes: new { @class = "control-label col-md-2" })
                <div class="col-md-10">
                    @Html.EditorFor(model => model.Name, new { htmlAttributes = new { @class = "form-control" } })
                    @Html.ValidationMessageFor(model => model.Name, "", new { @class = "text-danger" })
                </div>
            </div>

            <div class="form-group">
                @Html.LabelFor(model => model.JoiningDate, htmlAttributes: new { @class = "control-label col-md-2" })
                <div class="col-md-10">
                    @Html.EditorFor(model => model.JoiningDate, new { htmlAttributes = new { @class = "form-control" } })
                    @Html.ValidationMessageFor(model => model.JoiningDate, "", new { @class = "text-danger" })
                </div>
            </div>

            <div class="form-group">
                @Html.LabelFor(model => model.Age, htmlAttributes: new { @class = "control-label col-md-2" })
                <div class="col-md-10">
                    @Html.EditorFor(model => model.Age, new { htmlAttributes = new { @class = "form-control" } })
                    @Html.ValidationMessageFor(model => model.Age, "", new { @class = "text-danger" })
                </div>
            </div>

            <div class="form-group">
                <div class="col-md-offset-2 col-md-10">
                    <input type="submit" value="Create" class="btn btn-default" />
                </div>
            </div>
        </div>
    }

    <div>
        @Html.ActionLink("Back to List", "Index")
    </div>
</body>
</html>當用戶在創建視圖上輸入值時,它在FormCollection和Request.Form中都可用。可以使用這些值中的任何一個來填充視圖中的員工信息。
使用下面的代碼來(FormCollection)創建員工信息。參考以下代碼 -
// POST: Employee/Create
[HttpPost]
public ActionResult Create(FormCollection collection){
   try {
      Employee emp = new Employee();
      emp.Name = collection["Name"];
      DateTime jDate;
      DateTime.TryParse(collection["DOB"], out jDate);
      emp.JoiningDate = jDate;
      string age = collection["Age"];
      emp.Age = Int32.Parse(age);
      empList.Add(emp);
      return RedirectToAction("Index");
   }catch {
      return View();
   }
}
運行這個應用程序並請問這個URL: http:// localhost:63004 / Employee /。將收到以下輸出結果 -
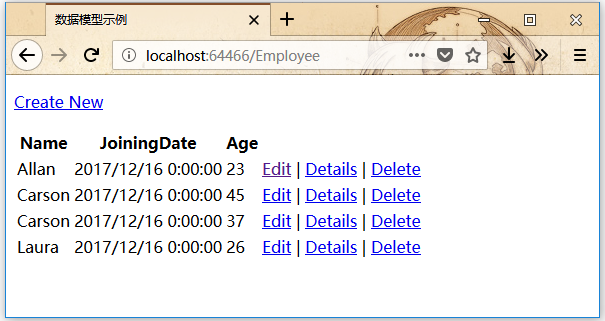
點擊頁面頂部的「Create New」鏈接,它將轉到下面的視圖。如下所示 -
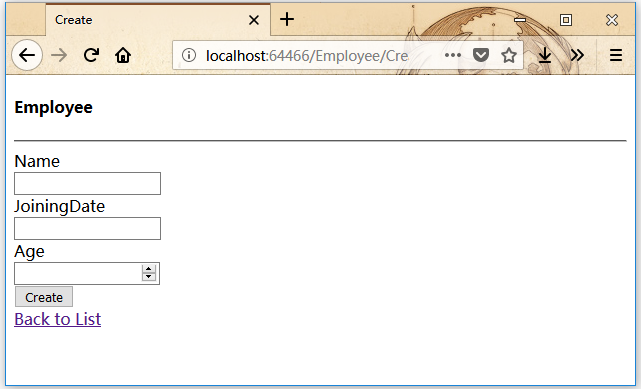
輸入想要添加的其他員工的數據。如下所示 -
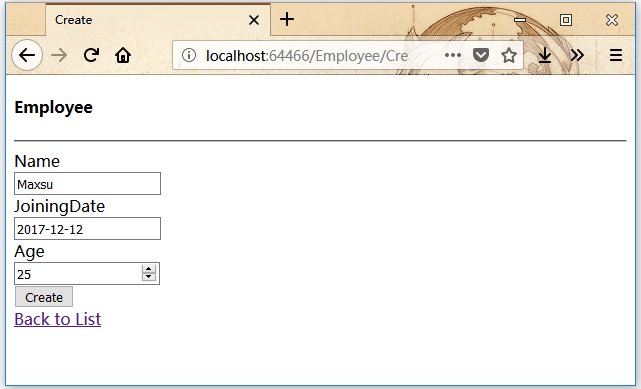
點擊創建按鈕,會看到新員工被添加到列表中。如下圖所示 -
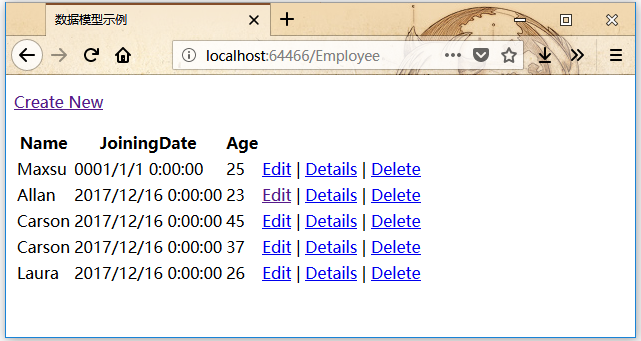
在上面的示例中,從HTML視圖中獲取所有發佈的值,然後將這些值映射到Employee屬性並逐一分配它們。
在這種情況下,我們也將在發佈的值與Model屬性的格式不相同的情況下進行類型轉換。
這也被稱爲手動綁定,這種類型的實現對於簡單和小數據模型可能不是那麼糟糕。 但是,如果對於具有大量的數據類型的模型,則需要大量的類型轉換,那麼可以利用ASP.NET MVC Model綁定的強大功能和易用性。
下面來看看爲模型綁定所做的另一個例子。
我們需要改變Create方法的參數來接受Employee模型對象而不是FormCollection對象,如下面的代碼所示。
// POST: Employee/Create
[HttpPost]
public ActionResult Create(Employee emp){
   try{
      empList.Add(emp);
      return RedirectToAction("Index");
   }catch{
      return View();
   }
}現在,模型綁定的魔力取決於提供值的HTML變量的id。
對於Employee模型,HTML輸入字段的id應該與Employee模型的屬性名稱相同,可以看到Visual Studio在創建視圖時使用了相同的模型屬性名稱。如下代碼 -
@Html.EditorFor(model => model.Name, new { htmlAttributes = new { @class = "form-control" } })映射將基於默認的屬性名稱。在這裏,您會發現HTML助手方法非常有用,因爲這些助手方法將生成HTML,它將具有適當的名稱以使模型綁定起作用。
運行修改代碼的應用程序,與上面的運行結果一樣。